The Validic Mobile library supports iOS 9 and above and requires Xcode version 8 or greater to compile.
The Validic Bluetooth, HealthKit and OCR frameworks are dependant on the Core framework.
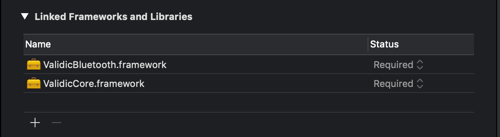
Copy ValidicCore, ValidicBluetooth, ValidicHealthKit, ValidicOCR and copy-validicmobile.rb files to the same folder where your Xcode project is. In Xcode, open your project and select your target. In the General tab there will be a panel at the bottom of the screen labeled “Linked Frameworks and Libraries”. You can either drag the framework files into the panel or click to + button, select Add Other.., select the Validic frameworks and click open.
In the picture below, we imported Validic Core and Bluetooth frameworks.
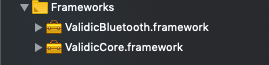
You should now see ValidicCore.framework and ValidicBluetooth.framework under “Linked Frameworks and Libraries” and in the file browser on the left under Frameworks. You should not see ValidicCore.framework or ValidicBluetooth.framework under “Embedded Binaries”.
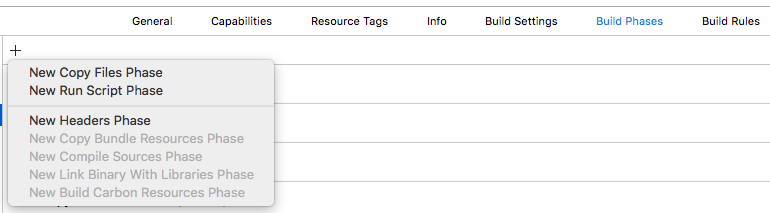
In the “Build Phases” tab add a new build phase by clicking the plus button at the top and selecting “New Run Script Phase”.
In the new phase’s text area paste in ruby copy-validicmobile.rb.

In the “Build Settings” tab find the “Enable Bitcode” option and make sure it’s set to YES.
iOS 10 requires usage descriptions to be declared in project’s Info.plist.
Privacy - Camera Usage Description key and value if edited in Xcode.
If viewing the raw source add the NSCameraUsageDescription key as displayed below.

Privacy - Health Share Usage Description and Privacy - Health Update Usage Description keys and values if edited in Xcode. 
If viewing the raw source add the NSHealthShareUsageDescription and NSHealthUpdateUsageDescription keys as displayed below.

Privacy - Bluetooth Peripheral Usage Description key and value if edited in Xcode.
If viewing the raw source add the NSBluetoothPeripheralUsageDescription key as displayed below.

If these values are not provided, the app will crash at runtime with an error reported to the console log.
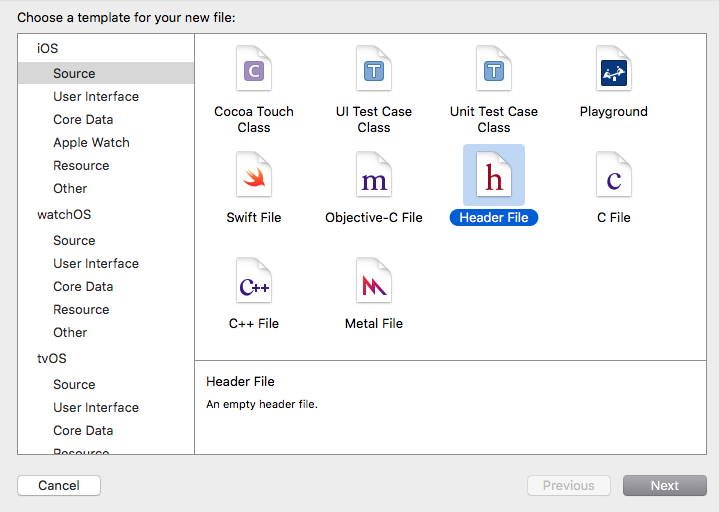
To use the frameworks with Swift, you will need to add a Bridging Header. In Xcode go to the File menu and under New select File (cmd+N). In the New File dialog box choose “Header File”.
Name the header file “[ProjectName]-Bridging-Header.h”.
Select [ProjectName]-Bridging-Header.h and add the following lines
#import <ValidicCore/ValidicCore.h>
#import <ValidicCore/ValidicBluetooth.h>
#import <ValidicCore/ValidicOCR.h>
#import <ValidicCore/ValidicHealthKit.h>
Then go to the build settings of your target and find the “Swift Compiler - Code Generation” section and double click on the “Objective-C Bridging Header” property. In the dialog box that appears enter the name of the bridging header file [ProjectName]-Bridging-Header.h.

The Validic Mobile library requires a Validic user. A Validic user can be provisioned using the Validic API. Further documentation is available for both the Legacy V1 API and the new Inform API.
You will need to provision the user on your server. The mobile app could then authenticate to the server and retrieve the needed Validic credentials.
The Validic Mobile library supports the following record types:
VLDSession stores a user, their current HealthKit subscriptions
and all pending record uploads. This data is persisted between
app launches but is deleted if endSession is called.
VLDSession is a singleton object and must be accessed by its
sharedInstance method. The different frameworks of the Validic
Mobile library rely on a valid user existing in the current
VLDSession singleton object.
To start a VLDSession you will need a VLDUser object. Generally you retrieve the credentials to instantiate a user object from your server.
The credentials needed are a Validic user ID, an organization ID and a user access token.
VLDUser *user = [[VLDUser alloc] initWithValidicUserID:@"user_id" organizationID:@"organization_id" accessToken:@"access_token"];
let user = VLDUser(validicUserID:"user_id", organizationID:"organization_id", accessToken:"access_token")
The user object is then passed to the startSessionWithUser: method. Note: starting a session will delete the current session if it exists.
[[VLDSession sharedInstance] startSessionWithUser:user];
VLDSession.sharedInstance().start(with: user)
When VLDSession uploads a record it will send an NSNotification. To listen for this
notification add an observer to the NSNotificationCenter with the constant kVLDRecordSubmittedNotification.
The object property of the notification will contain the VLDRecord object uploaded.
When VLDSession uploads an image, it will send a different notification, kVLDRecordImageSubmittedNotification. The object property of the notification will contain a VLDMediaServerResponse object containing an ID for the image, and its URL.
If a 400 error is returned from the server, the record will be discarded and an NSNotification will be posted.
To listen for this notification add an observer to the NSNotificationCenter with the constant
kVLDRecordSubmissionFailedNotification. The object property of the notification
will contain the invalid VLDRecord object.
The userInfo dictionary for this notification will contain one key, error with the NSError object for the failed upload.
If VLDSession attempts to upload the image associated with a record and the upload fails, an NSNotification, kVLDRecordImageSubmissionFailedNotification will be posted.
VLDBluetoothPeripheral represents Bluetooth peripheral models that can be discovered or read from by VLDBluetoothPeripheralController.
A peripheral object contains various information to be displayed to the user:
name - Name of the peripheral comprised of the the manufacturer name and model number.pairingInstructions - Text telling the user how to pair the peripheral, if the peripheral requires pairing.instructions - Text telling the user how to initialize the reading process with the peripheral.readingInstructions - Text telling the user what to do during the reading process.imageURL - URL for an image of the peripheral.To retrieve a List of supported peripherals simply call:
NSArray *supportedPeripherals = [VLDBluetoothPeripheral supportedPeripherals];

for (VLDBluetoothPeripheral *peripheral in supportedPeripherals) {
    NSLog(@"Peripheral: %@", [peripheral name]);
}
let supportedPeripherals = VLDBluetoothPeripheral.supportedPeripherals() as! [VLDBluetoothPeripheral]

for peripheral in supportedPeripherals {
    NSLog("Peripheral: %@", peripheral.name())
}
Other methods are available on VLDBluetoothPeripheral to allow retrieval of a specific peripheral, or to retrieve a list of peripherals of a specific peripheral type. See the VLDBluetoothPeripheral documentation for additional information.
Certain peripherals require pairing with the mobile device before a reading can be taken. You can check the requiresPairing property on the VLDBluetoothPeripheral object to know if it must be paired.
To pair a peripheral with the mobile device, call the pairPeripheral: method on VLDBluetoothPeripheralController.
VLDBluetoothPeripheral *peripheral = // A peripheral from the supportedPeripherals list
VLDBluetoothPeripheralController *controller = [[VLDBluetoothPeripheralController alloc] init];
controller.delegate = self;

[controller pairPeripheral:peripheral];
let peripheral: VLDBluetoothPeripheral = // A peripheral from the supportedPeripherals list
let controller = VLDBluetoothPeripheralController()
controller.delegate = self

controller.pairPeripheral(peripheral)
To know if a peripheral was successfully paired you will need to implement the pairing methods of the VLDBluetoothPeripheralControllerDelegate protocol.
- (void)bluetoothPeripheralController:(VLDBluetoothPeripheralController *)controller didPairPeripheral:(VLDBluetoothPeripheral *)peripheral
{
    // Peripheral paired successfully
}

- (void)bluetoothPeripheralController:(VLDBluetoothPeripheralController *)controller didNotPairPeripheral:(VLDBluetoothPeripheral *)peripheral error:(NSError *)error
{
    // Peripheral did not pair
}
func bluetoothPeripheralController(_ controller: VLDBluetoothPeripheralController!, didPairPeripheral peripheral: VLDBluetoothPeripheral!) {
    // Peripheral paired successfully
}

func bluetoothPeripheralController(_ controller: VLDBluetoothPeripheralController!, didNotPairPeripheral peripheral: VLDBluetoothPeripheral!, error: Error!) {
    // Peripheral did not pair
}
Once you are ready to read from a peripheral, the process is fairly similar to the pairing process. You should initially show the peripheral’s instructions and then show the reading instructions once bluetoothPeripheralController:isReadyToReadFromPeripheral: is called.
VLDPeripheral *peripheral = // The peripheral you want to read from
VLDBluetoothPeripheralController *controller = [[VLDBluetoothPeripheralController alloc] init];
controller.delegate = self;

[controller readFromPeripheral:peripheral];
let peripheral: VLDBluetoothPeripheral = // A peripheral from the supportedPeripherals list
let controller = VLDBluetoothPeripheralController()
controller.delegate = self

controller.read(from: peripheral)
You must also implement the reading methods of the VLDBluetoothPeripheralControllerDelegate protocol.
- (void)bluetoothPeripheralController:(VLDBluetoothPeripheralController *)controller isReadyToReadFromPeripheral:(VLDBluetoothPeripheral *)peripheral
{
    // Time to present the readingInstructions to the user
}

- (BOOL)bluetoothPeripheralController:(VLDBluetoothPeripheralController *)controller shouldSubmitReadings:(NSArray *)records fromPeripheral:(VLDBluetoothPeripheral *)peripheral
{
    // To have the reading automatically added to the session and uploaded
    // return YES from this method. To first have the reading validated by the user
    // you can return NO from this method. Once the user has validated the reading
    // you must manually submit the record by calling [[VLDSession sharedInstance] submitRecord:record]
    return YES;
}

- (void)bluetoothPeripheralController:(VLDBluetoothPeripheralController *)controller didCancelReadingForPeripheral:(VLDBluetoothPeripheral *)peripheral
{
    // Reading was cancelled
}

- (void)bluetoothPeripheralController:(VLDBluetoothPeripheralController *)controller readingFailedForPeripheral:(VLDBluetoothPeripheral *)peripheral error:(NSError *)error
{
    // Reading failed
}
func bluetoothPeripheralController(_ controller: VLDBluetoothPeripheralController!, isReadyToReadFrom peripheral: VLDBluetoothPeripheral!) {
    // Time to present the readingInstructions to the user
}

func bluetoothPeripheralController(_ controller: VLDBluetoothPeripheralController!, shouldSubmitReadings records: [VLDRecord]!, from peripheral: VLDBluetoothPeripheral!) -> Bool {
    // To have the reading automatically added to the session and uploaded
    // return YES from this method. To first have the reading validated by the user
    // you can return NO from this method. Once the user has validated the reading
    // you must manually submit the record by calling VLDSession.sharedInstance().submitRecord(record)
    return true
}

func bluetoothPeripheralController(_ controller: VLDBluetoothPeripheralController!, didCancelReadingFor peripheral: VLDBluetoothPeripheral!) {
    // Reading was cancelled
}

func bluetoothPeripheralController(_ controller: VLDBluetoothPeripheralController!, readingFailedFor peripheral: VLDBluetoothPeripheral!, error: Error!) {
    // Reading failed
}
The ValidicMobile library supports passively reading from a given set of Bluetooth peripherals. Passive Bluetooth reading is a long lived capability. Once enabled, the library will listen for and read from the specified peripherals. Reading will automatically occur once the peripheral is discovered regardless of app state. This includes if the application is currently in the foreground, in the background, or has been terminated due to memory pressure. Apps using this feature must have been started by the user at least once since the iOS device has booted otherwise the feature will not be active even if enabled.
VLDBluetoothPassiveManager is a singleton which coordinates the passive reading process. Passive reading is enabled by passing it an array of peripheral IDs:
[VLDBluetoothPassiveManager sharedInstance].peripheralIDs = @[ @1, @2 ];
VLDBluetoothPassiveManager.sharedInstance().peripheralIDs = [1, 2]
Or by passing an array of peripherals:
VLDBluetoothPeripheral *peripheral = [VLDBluetoothPeripheral peripheralForID:1];
if (peripheral) {
    [[VLDBluetoothPassiveManager sharedInstance] setPeripherals:@[peripheral]];
}
if let peripheral = VLDBluetoothPeripheral(forID: 1) {
    VLDBluetoothPassiveManager.sharedInstance().setPeripherals([peripheral])
}
To disable passive reading, set the peripheralIDs property to an empty array or nil.
[VLDBluetoothPassiveManager sharedInstance].peripheralIDs = nil;
VLDBluetoothPassiveManager.sharedInstance().peripheralIDs = nil
Passive Bluetooth reading relies upon iOS Bluetooth state restoration and background processing support. Apps using passive reading need to set Bluetooth as a required background mode in the Info.plist. In Xcode, in the Info.plist add a new key, Required background modes, add an item with value App communicates using CoreBluetooth.

If editing the XML source file, add Bluetooth-central background mode as follows:
    <key>UIBackgroundModes</key>
    <array>
        <string>Bluetooth-central</string>
    </array>
To support state restoration, a method on the passive manager must be called on app launch. This should be done in the application:didFinishLaunchingWithOptions: method of the AppDelegate as follows:
- (BOOL)application:(UIApplication *)application didFinishLaunchingWithOptions:(NSDictionary *)launchOptions {
    [[VLDBluetoothPassiveManager sharedInstance] restoreState];
    return YES;
}
    func application(_ application: UIApplication, didFinishLaunchingWithOptions launchOptions: [UIApplicationLaunchOptionsKey : Any]? = nil) -> Bool {
        VLDBluetoothPassiveManager.sharedInstance().restoreState()
        return true
    }
State restoration will automatically start the app in the background when a requested peripheral is discovered. Within application:didFinishLaunchingWithOptions:, apps can determine if they were launched in background and avoid expensive operations.
Passive readings are automatically sent to the Validic server. Session notifications are sent on upload success or failure. Passive Bluetooth specific notifications are sent when a device is discovered and becomes ready to read. Notifications are also sent for reading success and failure. These notifications specify the associated peripheral ID in the userInfo dictionary with a key, peripheralID.
kVLDBluetoothPassiveDidReadNotification is sent when records are read. The notification object is an array of VLDRecord read from the peripheral.kVLDBluetoothPassiveDidFailNotification is sent when failing to read from a discovered peripheral.kVLDBluetoothPassiveIsReadyToReadNotification is sent when the peripheral becomes ready to read. This notification is only sent out for devices that are discoverable before a measurement is taken. It is important to handle this notification in an app and provide feedback to the user that the device has been discovered and is ready to take a measurement. Since Passive Bluetooth reading is usually performed in the background, a standard UI is not available. A local notification can be sent with sound to provide feedback to the user that the app is ready to read from the peripheral. If the user doesn’t hear the sound, it indicates that the device has not been discovered.The following code fragment registers an observer for the kVLDBluetoothPassiveIsReadyToReadNotification notification and sends a local notification including the name of the peripheral. A similar process could be done for the kVLDBluetoothPassiveDidReadNotification to confirm to the user that a reading was successfully taken.
- (BOOL)application:(UIApplication *)application didFinishLaunchingWithOptions:(NSDictionary *)launchOptions {
    [[VLDBluetoothPassiveManager sharedInstance] restoreState];
    [[NSNotificationCenter defaultCenter] addObserver:self selector:@selector(handleIsReadyToReadNotification:)
                                                 name:kVLDBluetoothPassiveIsReadyToReadNotification object:nil];
    return YES;
}

- (void)handleIsReadyToReadNotification:(NSNotification *)notification {
    if ([UIApplication sharedApplication].applicationState == UIApplicationStateBackground) {
        NSNumber *peripheralID = (NSNumber *)notification.userInfo[@"peripheralID"];
        NSString *peripheralName = [VLDBluetoothPeripheral peripheralForID:[peripheralID unsignedIntegerValue]].name;
        UILocalNotification *localNotification = [[UILocalNotification alloc] init];
        localNotification.alertBody = [NSString stringWithFormat:@"Ready to read %@", peripheralName];
        [[UIApplication sharedApplication] presentLocalNotificationNow:localNotification];
    }
}
NotificationCenter.default.addObserver(forName: NSNotification.Name.vldBluetoothPassiveIsReadyToRead, object: nil, queue: nil) { (notification) in
    if UIApplication.shared.applicationState == .background {
        if let peripheralID = notification.userInfo?["peripheralID"] as? UInt,
            let peripheralName = VLDBluetoothPeripheral.init(forID: peripheralID)?.name()
        {
            let localNotification = UILocalNotification()
            localNotification.alertBody = "Ready to read \(peripheralName)"
            UIApplication.shared.presentLocalNotificationNow(localNotification)
        }
    }
}
There are situations where passive Bluetooth reading is stopped and requires the app to be relaunched. These situations include:
Passive Bluetooth reading has some additional considerations due to the behavior of the iOS Bluetooth stack and background support.
The Validic Mobile library provides a simple way to read and upload data from HealthKit to Validic. VLDHealthKitManager can subscribe to specific HealthKit sample types and automatically upload them to Validic in the background as new data is recorded.
Before you can use the HealthKit features of the library, be sure to import the HealthKit framework into your project and enable the HealthKit entitlements for your app.
Useful sets of sample types are defined in an VLDHealthKitSubscriptionSet enum. Sample types for a subscription set can be retrieved using the sampleTypesForSubscriptionSet: static method of the VLDHealthKitSubscription class. The following subscription sets are available:
VLDHealthKitSubscriptionSetRoutine: Includes Flights Climbed, Active Energy Burned, Distance Walking/Running, Step Count, and Basal Energy Burned. In iOS 9 and later this also includes Apple Stand Hours, Apple Exercise Minutes, and Mindful Minutes (from the Apple Watch). In iOS 10 and later this will also include Wheelchair Distance and Wheelchair Push Count.VLDHealthKitSubscriptionSetDiabetes: Blood Glucose sample type.VLDHealthKitSubscriptionSetWeight: Includes Body Mass (weight), Height, Body Fat Percentage, Lean Body Mass, and Body Mass Index.VLDHealthKitSubscriptionSetFitness: Includes Workout, Nike Fuel, and Cycling Distance.VLDHealthKitSubscriptionSetSleep: Sleep Analysis sample type, this set tracks time in bed, time awake, and time asleep.VLDHealthKitSubscriptionSetBasicNutrition: Includes Calcium, Carbohydrates, Cholesterol, Fiber, Iron, Potassium, Protein, Saturated Fat, Sodium, Sugar, Total Fat,
and Energy Consumed. in iOS 9 and later this will also include Dietary Water.VLDHealthKitSubscriptionSetReproductiveHealth: Includes Sexual Activity, Cervical Mucus Quality, Intermenstrual Bleeding, Menstrual Flow, Ovulation Test Result,
and BasalBodyTemperature. These sample types are only available in iOS 9 and later.VLDHealthKitSubscriptionSetBiometrics: Includes Systolic Blood Pressure, Diastolic Blood Pressure, Heart Rate,
Body Temperature, and SpO2 (oxygen saturation).Subscribing to HealthKit updates only needs to be done once for a user. The subscriptions will be persisted across app launches in the VLDSession object. A typical use of the HealthKit framework would be to create a UISwitch that adds the required subscriptions when turned on and removes them when turned off. Example:
- (IBAction)switchAction:(UISwitch *)sender {
    NSMutableArray *subscriptions = [[NSMutableArray alloc] init];
    if ([(UISwitch *)sender isOn]) {
        [subscriptions addObjectsFromArray:[VLDHealthKitSubscription sampleTypesForSubscriptionSet:VLDHealthKitSubscriptionSetBloodPressure]];
    }

    [[VLDHealthKitManager sharedInstance] setSubscriptions:subscriptions completion:nil];
}
@IBAction func switchAction(sender: UISwitch) {
    var subscriptions = [HKSampleType]()
    if sender.isOn {
        subscriptions.append(contentsOf: VLDHealthKitSubscription.sampleTypes(for: VLDHealthKitSubscriptionSet.bloodPressure))
    }

    VLDHealthKitManager.sharedInstance().setSubscriptions(subscriptions, completion: nil)
}
To properly process the delivery of data in the background, the subscription observers need to be recreated immediately when the app is launched. To do this, you need to call [VLDHealthKitManager observeCurrentSubscriptions] inside your application delegate’s application:didFinishLaunchingWithOptions: callback. Example:
- (BOOL)application:(UIApplication *)application didFinishLaunchingWithOptions:(NSDictionary *)launchOptions {
    [[VLDHealthKitManager sharedInstance] observeCurrentSubscriptions];
    // your application's initialization code
    return YES;
}
func application(_ application: UIApplication, didFinishLaunchingWithOptions launchOptions: [UIApplicationLaunchOptionsKey : Any]? = nil) -> Bool {
    VLDHealthKitManager.sharedInstance().observeCurrentSubscriptions()
    // your application's initialization code
    return true
}
Note: Calling [[VLDSession] sharedInstance] endSession] in Objective-C or VLDSession.sharedInstance().end() in Swift will remove all HealthKit subscriptions and stop listening for new data.
The Validic Mobile library provides the ability to query 6 months of data for a subset of data types provided by HealthKit by specifying one of more values of the VLDHealthKitHistoricalSet enum.
Two historical sets are available
To fetch 6 months of historical HealthKit data, call the fetchHistoricalSets: method on VLDHealthKitManager and pass in the datasets you want to fetch. Example:
[[VLDHealthKitManager sharedInstance] fetchHistoricalSets:@[@(VLDHealthKitHistoricalSetRoutine), @(VLDHealthKitHistoricalSetFitness)]
                                                       completion:^(NSDictionary * _Nullable results, NSError * _Nullable error) {
                                                       // historical fetch complete
        }];
VLDHealthKitManager.sharedInstance().fetchHistoricalSets([NSNumber(value:VLDHealthKitHistoricalSet.fitness.rawValue),
                                                          NSNumber(value:VLDHealthKitHistoricalSet.routine.rawValue)]) {
                                                          (results:[AnyHashable : Any]?, error:Error?) in
    // historical fetch complete
}
Doing this may display a permission dialogue from HealthKit so it’s important to call this at an appropriate time in your app. It is recommended to explain to the user why you want this data before attempting to fetch it. This operation may take several seconds to complete so it would be advisable to display an activity indicator to the user until the completion block is called. There should be no need to call this method more than once for a user. When the fetch completes all the data will have been fetched locally and queued up for submission to the server. The amount of time needed to upload the records may vary based on the user’s internet speed. The queued records are uploaded automatically by the library based on connectivity, but it is possible for the user to suspend the app before all the records have been uploaded, the remaining records will be uploaded when the user resumes the app. This should be kept in mind when receiving records from the Validic server.
The Validic mobile library OCR feature provides the capability to obtain readings from devices without requiring Bluetooth or HealthKit integration.
VLDOCRPeripheral represents peripheral models that can be processed by OCR.
A peripheral object contains various properties which can be displayed to the user:
name - Name of the peripheral comprised of the manufacturer name and model number.imageURL - URL for an image of the peripheral.overlayImage - UIImage of the overlay used to position the peripheral within the camera preview.To obtain a VLDOCRPeripheral, several class methods are provided to be able to retreive one or more supported peripherals.
// Retreive a specific peripheral
VLDOCRPeripheral *peripheral = [VLDOCRPeripheral peripheralForID:1];
// or by type
NSArray *peripherals = [VLDOCRPeripheral peripheralsOfType: VLDPeripheralTypeGlucoseMeter];
// or retrieve a list of all supported peripherals
NSArray *peripherals = [VLDOCRPeripheral supportedPeripherals];
// Retreive a specific peripheral
let peripheral = VLDOCRPeripheral(forID: 1)
// or by type
let peripherals = VLDOCRPeripheral.peripherals(of: .glucoseMeter)
// or retrieve a list of all supported peripherals
let peripherals = VLDOCRPeripheral.supportedPeripherals()
The VLDOCRViewController provides a simple interface to optically scan a peripheral and provide the resulting reading. This view controller presents a prepackaged view and is typically displayed modally. It presents a camera view with an overlay appropriate to the peripheral being scanned. Partial results are displayed in the view while recognition is in progress. When it converges on a value, the delegate method, ocrViewController:didCompleteReading:image:metadata: is called with the results. An example application, “OCR example”, is provided, written in Swift which illustrates this OCR API. It is contained within the “Example Apps/Swift OCR” directory in the library download.
The app must have access to the camera. Permission will be requested on first launch. If the library is unable to access the camera, the delegate method,
ocrViewControllerWasDeniedCameraAuthorization: is called. In iOS 10 and later, the info.plist must also include a Camera Usage Description as described in Supporting iOS 10.
The presented view provides a button to cancel OCR. If the user cancels, the delegate method, ocrViewControllerDidCancel: is called.
When any of the three delegate methods are invoked, the view controller should be dismissed.
The following example constructs a VLDOCRViewController for the designated peripheral and presents it.
VLDOCRViewController *viewController = [[VLDOCRViewController alloc] initWithOCRPeripheralID:9];
viewController.delegate = self;
[self presentViewController:viewController animated:YES completion:nil];
if let controller = VLDOCRViewController(ocrPeripheralID: 3) {
   controller.delegate = self
   self.present(controller, animated: true, completion: nil)
}
Delegate call backs dismiss the view controller and handle the returned record. The recognized value returned in the delegate call back should be displayed to the user so that they can verify the value and modify it if incorrect. The image that was recognized is also provided and can be displayed to the user to verify the value.
- (void)ocrViewController:(VLDOCRViewController *)viewController didCompleteReading:(VLDRecord *)record image:(UIImage *)image metadata:(NSDictionary *)metadata
{
    NSLog(@"Reading: %@", [record description]);
    [self dismissViewControllerAnimated:YES completion:nil];
}

- (void)ocrViewControllerWasDeniedCameraAuthorization:(VLDOCRViewController *)viewController
{
    [self dismissViewControllerAnimated:YES completion:nil];
}

- (void)ocrViewControllerDidCancel:(VLDOCRViewController *)viewController
{
    [self dismissViewControllerAnimated:YES completion:nil];
}
func ocrViewControllerDidCancel(_ viewController: VLDOCRViewController) {
  viewController.dismiss(animated: true, completion: nil);
}

func ocrViewControllerWasDeniedCameraAuthorization(_ viewController: VLDOCRViewController) {
    print("Unable to access camera")
    viewController.dismiss(animated: true, completion: nil);
}

func ocrViewController(_ viewController: VLDOCRViewController, didCompleteReading record: VLDRecord?, image: UIImage?, metadata: [AnyHashable : Any]?) {
    // Display the value and image, allow the user to correct
    viewController.dismiss(animated: true, completion: nil);
}
The record received from the OCR View Controller should be verified by the user and then submitted to the Validic server.
// After verification, queue the record and image to be uploaded to the server
[[VLDSession sharedInstance] submitRecord:record image:image];
// After verification, queue the record and image to be uploaded to the server
VLDSession.sharedInstance().submitRecord(record, image: image)
For any glucose meter in our lineup of supported meters, you can now specify mmol/l or mg/dL at runtime for a given reading. If no unit is provided, mg/dL is assumed.
An example using the VLDOCRViewController:
*ocrViewController = [[VLDOCRViewController alloc] initWithOCRPeripheralID:9 glucoseUnit:.MMOLL];
ocrViewController = VLDOCRViewController(ocrPeripheralID: 9, glucoseUnit: .MMOLL)
If more control over the OCR view is needed, a custom view can be implemented to perform OCR using the VLDOCRController class. The simpler VLDOCRViewController is recommended unless customizing the view is required. A example application, “VitalSnap example”, is provided written in Swift which illustrates this OCR API. It is contained within the “Example apps/Swift VitalSnap” directory in the library download.
An instance of the VLDOCRController class is used to manage the recognition process. A VLDOCRPeripheral represents the peripheral being scanned. The controller is initialized with a peripheral object.
The recognition process involves a video camera preview layer and an overlay image, both obtained from the controller. The overlay image must be precisely positioned over the preview layer for proper alignment and recognition using a frame provided by the controller.
The app creates a view hierarchy where a parent view contains two subviews (preview and overlay). The controller is configured with the size of the preview layer and it generates the appropriate frame for the overlay image view.
OCR processing begins as soon as the controller is initialized. A delegate is called with intermediate and final results. The camera capture session ends when the controller is deallocated.
Two different approaches can be used to structure views for the preview and overlay, using either a UIImageView or CALayer for the overlay image.
In the preferred view based approach, a parent view contains two subviews, one for the preview and the other for the overlay image. The preview layer is obtained from the VLDOCRController and added as a sublayer to the preview view. Once this layer is added, no subviews of the preview view will be visible. The overlay view, typically a UIImageView, and sibling of the overlay view, contains the overlay image obtained from the VLDOCRController, positioned to the frame specified by the controller. The origin of both views is assumed to be [0,0] within their parent. The parent and and preview view are typically full screen.
In the alternate approach, a single view is used. The preview layer is added to this view and an additional CALayer is created, the overlay image is set on that CALayer and it is added as another sublayer to the same view. The overlay layer’s frame must be set to the frame given by the VLDOCRController.
The VLDOCRController requires a VLDOCRPeripheral for its initializers.
Once a peripheral is obtained, construct the VLDOCRController and assign its delegate.
// Maintain a reference to the controller
@property (nonatomic, strong) VLDOCRController *controller;
...
self.controller = [[VLDOCRController alloc] initWithOCRPeripheral:peripheral];
// Assign a delegate
self.controller.delegate = self;
// Maintain a reference to the controller
var controller: VLDOCRController?
...
self.controller = VLDOCRController(ocrPeripheral: peripheral)
// Assign a delegate
self.controller.delegate = self
The camera preview layer is obtained from VLDOCRController and is added as a sublayer to a view within a view hierarchy as described under View Structure.
// Property or IBOutlet
@property (strong, nonatomic) IBOutlet UIView *previewView;

// Typically set up in ViewDidLoad
- (void)viewDidLoad {
    CALayer *previewLayer = self.controller.previewLayer;
    [previewView.layer addSublayer:previewLayer];
// Property or IBOutlet
@IBOutlet var previewView: UIView!

// Typically set up in ViewDidLoad
override func viewDidLoad() {
    if let previewLayer: AVCaptureVideoPreviewLayer = controller.previewLayer {
        previewView.layer.addSublayer(previewLayer)
Set the previewLayer’s frame to match those of its containing preview view. Typically within viewDidLayoutSubviews.
- (void)viewDidLayoutSubviews {
    self.controller.previewLayer.frame = self.previewView.bounds;
override func viewDidLayoutSubviews() {
    self.controller.previewLayer?.frame = self.previewView.bounds
An overlay image is displayed over the preview layer using a specific frame calculated by VLDOCRController.
The image is obtained from the VLDOCRPeripheral used to initialize the VLDOCRController.
@property (strong, nonatomic) IBOutlet UIImageView *overlayView;

- (void)viewDidLoad {
    // VLDOCRPeripheral *peripheral = ...
    overlayView.image = [peripheral overlayImage];
@IBOutlet var overlayView: UIImageView!

override func viewDidLoad() {
    // let peripheral: VLDOCRPeripheral = ...
    overlayView.image = peripheral.overlayImage()
Whenever the preview layer’s frame changes, the controller needs to be informed by invoking configureForPreviewLayerSize:. After this call, the overlayView’s frame should be set using the overlayFrame property of the VLDOCRController.
- (void)viewDidLayoutSubviews {
    // Configure VLDOCRController with the current preview layer size
    [self.controller configureForPreviewLayerSize:previewLayer.bounds.size];
    self.overlayView.frame = self.controller.overlayFrame;
    ...
override func viewDidLayoutSubviews() {
    // Configure VLDOCRController with the current preview layer size
    self.controller.configureForPreviewLayerSize(previewLayer.bounds.size)
    self.overlayView.frame = self.controller.overlayFrame
During OCR processing, methods on a delegate conforming to the VLDOCRControllerDelegate protocol are invoked.
ocrController:didProcessResult: is invoked for each camera frame captured and provides intermediate results. The VLDOCRResult object contains the current recognized string, an object describing possible glare, and the cropped image that was associated with this incomplete result. The result string can be displayed to the user as an indication of what portion of the display is not being recognized. Depending on the peripheral, the result string may contain linefeeds representing multiple lines being recognized.
- (void)ocrController:(VLDOCRController *)ocrController didProcessResult:(VLDOCRResult *)result {
    NSLog(@"Partial result %@", result.resultString);
    UIImage *resultImage = result.image;
}
func ocrController(_ ocrController: VLDOCRController, didProcessResult result: VLDOCRResult?) {
    if let result = result {
        NSLog("Partial result \(result.resultString)")
        let resultImage = result.image
    }
}
The ocrController:didCompleteReading:image:forPeripheral:metadata: delegate method is invoked when OCR processing has completed with reasonably high confidence.
- (void)ocrController:(VLDOCRController *)ocrController
   didCompleteReading:(VLDRecord *)record
                image:(UIImage *)image
        forPeripheral:(VLDOCRPeripheral *)peripheral
             metadata:(NSDictionary *)metadata
{
    // Obtain fields from the record to display to the user
    if (peripheral.type == VLDPeripheralTypeGlucoseMeter) {
        VLDDiabetes *diabetesRecord = (VLDDiabetes *)record;
        NSNumber *bloodGlucose = diabetesRecord.bloodGlucose;

        // Obtain the captured image, display to the user for verification of reading
        verificationImageView.image = image;
        ...
    }
func ocrController(ocrController: VLDOCRController!, didCompleteReading record: VLDRecord!, image: UIImage!, forPeripheral peripheral: VLDOCRPeripheral!, metadata: [NSObject : AnyObject]!) {
    // Obtain fields from the record to display to the user
    if peripheral.type == VLDPeripheralType.glucoseMeter {
        if let diabetesRecord = record as? VLDDiabetes {
            let bloodGlucose: NSNumber? = diabetesRecord.bloodGlucose

            // Obtain the captured image, display to the user for verification of reading
            var verificationImageView: UIImageView
            verificationImageView.image = image
        }
    }
}
The value received from the OCR controller should be verified by the user and then submitted to the Validic server.
// After verification, queue the record and image to be uploaded to the server
[[VLDSession sharedInstance] submitRecord:record image:image];
// After verification, queue the record and image to be uploaded to the server
VLDSession.sharedInstance().submitRecord(record, image: image)
The delegate is passed a VLDRecord subclass appropriate for the peripheral, the matching cropped preview image and additional metadata. The recognized values returned in the record should be visually validated by the user. The cropped preview image can be displayed to the user to validate the recognized values before uploading to the server.
When the user approves of the values, the record can be uploaded as described in Managing a Session.
OCR processing commences when the VLDOCRController is instantiated.
The camera preview session is stopped when the VLDOCRController is deallocated. OCR processing stops when the final result delegate method is invoked or when the controller is deallocated. To restart or to work with a different peripheral, construct a new VLDOCRController.
Instead of placing the overlay image within a sibling view in a view hierarchy, the overlay image can be displayed in a CALayer added to the same view containing the preview layer. A separate view for the overlay is unnecessary.
@property (nonatomic, strong) CALayer *overlayLayer;
...
- (void)viewDidLoad {
    self.overlayLayer = [[CALayer alloc] init];
    self.overlayLayer.contents = (__bridge id _Nullable)(peripheral.overlayImage.CGImage);
    [self.previewView.layer addSublayer:self.overlayLayer];
var overlayLayer:CALayer?
...
override func viewDidLoad() {
    self.overlayLayer = CALayer()
    self.overlayLayer.contents = peripheral.overlayImage()?.cgImage
    self.previewLayer.addSublayer(overlayLayer)
The overlayLayer’s frame needs to be set when the contain view’s frame changes,
- (void)viewDidLayoutSubviews {
    [self.controller configureForPreviewLayerSize:self.controller.previewLayer.bounds.size];
    self.overlayLayer.frame = self.controller.overlayFrame;
override func viewDidLayoutSubviews() {
    self.controller.configure(forPreviewLayerSize:(self.controller.previewLayer.bounds.size)!)
    self.overlayLayer.frame = self.controller.overlayFrame