This tutorial assumes Xamarin Studio or Visual Studio is installed on the development machine and a new Xamarin Android Project is open. The following must be added to the AndroidManifest.xml and is required to use Validic Mobile:
<uses-sdk android:minSdkVersion="19" />
And to use VitalSnap requires a minimum sdk version of 21:
<uses-sdk android:minSdkVersion="21" />
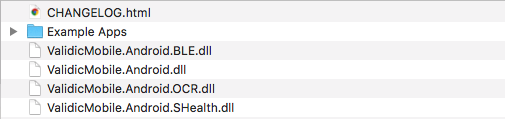
Starting with version 1.6.0 the library has been divided into 4 separate modules.
Add a reference to the libraries needed for your project from the distribution zip
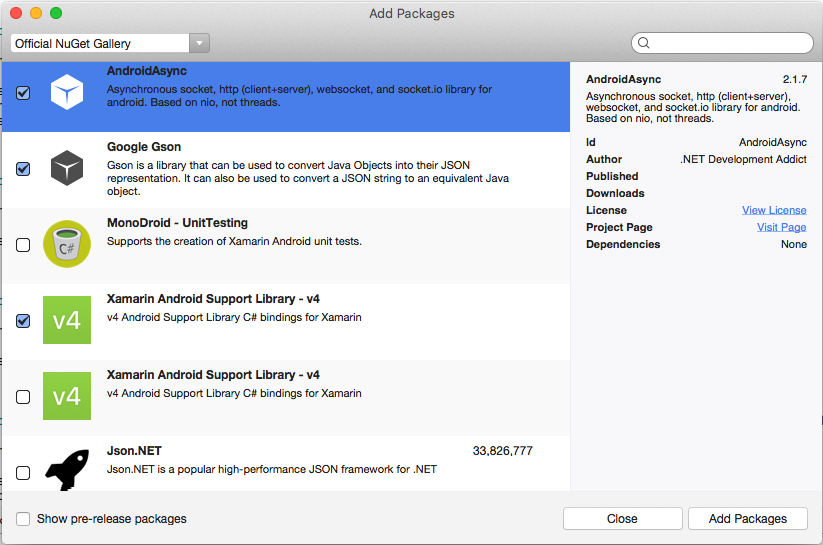
Add the Google Gson and AndroidAsync packages from NuGet. If the app will be using Bluetooth or OCR functionality also add the Android Support Library
Finally initialize the library within your Application class’s onCreate:
public override void onCreate() {
    base.onCreate();
    Validic.Instance.Initialize(this);
}
or in the Launcher Activity class’s onCreate:
public override void onCreate(Bundle instanceState) {
    base.onCreate();
    Validic.Instance.Initialize(ApplicationContext);
}
Session is a singleton object and must be accessed by its Instance field.
The Session instance stores a User and all pending Record uploads.
To use an existing user ID, create a User object and provide it to the StartSessionWithUser(User) method.
var user = new User("Your Organization ID",
                     "A Validic User ID",
                     "A Validic User Access Token");

Session.Instance.StartSessionWithUser(user);
User data is persisted between app launches but is deleted if EndSession() is called.
Session.Instance.EndSession();
There are seven different subclasses of Record that will be collected by Validic
Choose a data type to test with and construct a BaseRecord object:
var testRecord = new Weight();
testRecord.Weight = new BigDecimal("200");
Records can be submitted individually:
var record = new Weight();
record.Weight = new BigDecimal("200");
Session.Instance.SubmitRecord(record);
or as a group:
var records = new ArrayList();
var record1 = new Weight();
var record2 = new Weight();
records.Add(record1);
records.Add(record2);

Session.Instance.SubmitRecords(records);
When Session uploads a record it will notify any stored ISessionListener. To listen for these callbacks, create a class that implements ISessionListener and set the listener on the session. If a 400 error is returned from the server, the record will be discarded and DidFailToSubmitRecord(BaseRecord, Error) will be called. If the record is submitted successfully, DidSubmitRecord(Record) will be called.
public class ISessionListenerImpl : Java.Lang.Object, ISessionListener{
    public DidFailToSubmitRecord(BaseRecord record, Error error){
        //Record processing failed
    }
    public DidSubmitRecord(BaseRecord record){
        // Record was successfully submitted
    }
}
...
ISessionListenerImpl listener = new ISessionListenerImpl();
Session.Instance.SetSessionListener(listener);
Session will also fire events for each callback method. Objects can register for callbacks for these events:
Session.Instance.DidSubmitRecord += (session,eventArgs)=>{
    //Record was successfully submitted
}
Session.Instance.DidFailToSubmitRecord += (session, eventArgs)=>{
    //Record was not successfully added to the processing queue
{
A BluetoothPeripheral represents Bluetooth peripheral models that can be discovered or read from by BluetoothPeripheralController.
The BluetoothPeripheral class contains various properties to be displayed to the user:
Name – Returns a String representing the customer recognizable name of the peripheral.ImageUrl – Returns either a local image path (prefixed with “assets://”) or a remote image path to an example peripheral image.PairingInstruction – Returns a String telling the user how to pair the peripheral, if the peripheral requires pairing.Instruction – Returns a String telling the user how to initialize the reading process with the peripheral.ReadingInstruction – Returns a String telling the user what to do during the reading process.To retrieve a List of supported perpherals simply call:
IList<BluetoothPeripheral> supportedPeripherals = BluetoothPeripheral.SupportedPeripherals();

foreach(BluetoothPeripheral peripheral in supportedPeripherals) {
    Log.V("Test", "Found peripheral: " + peripheral.Name);
}
To retrieve a specific peripheral:
var peripheral = BluetoothPeripheral.GetPeripheralForID(1);
Peripherals are grouped by type such as thermometer, glucose, scale,etc. To retrive an array of peripherals by peripheral type:
IList<BluetoothPeripheral> peripherals = BluetoothPeripheral.GetPeripheralsForType(Peripheral.PeripheralType.GLUCOSE);
Check if a BluetoothPeripheral requires pairing by calling:
BluetoothPeripheral peripheral = // ...
if(peripheral.RequiresPairing){
    // pair
}
If it does, the user must pair the perpheral before they can take a reading. In order to listen to bluetooth events create a new class that implements IBluetoothPeripheralControllerListener or subclasses SimpleBluetoothperipheralController and override any methods you would like to receive callbacks for.
public class BluetoothPairListener: SimpleBluetoothPeripheralControllerListener
{
    public override void OnFail(BluetoothPeripheralController controller, BluetoothPeripheral peripheral, BluetoothPeripheralController.BluetoothError error)
    {
        base.OnFail(controller, peripheral, error);
        // Tell the user to retry they pairing process
    }

    public override void OnSuccess(BluetoothPeripheralController controller, BluetoothPeripheral peripheral)
    {
        base.OnSuccess(controller, peripheral);
        // The peripheral is now ready to read!
    }


    public override void OnPeripheralDiscovered(BluetoothPeripheralController controller, BluetoothPeripheral peripheral)
    {
        base.OnperipheralDiscovered(controller, peripheral);
        // The peripheral is currently pairing...
    }
};
BluetoothPeripheral peripheral = // choose a peripheral from the supported perpherals list
BluetoothPeripheralController controller = new BluetoothPeripheralController();
controller.PairPeripheral(peripheral, new BluetoothListener());

String pairingInstructions = peripheral.PairingInstruction;
// Display the pairingInstructions to the user
Once you are ready to read from a peripheral, the reading process is fairly similar to the pairing process. You’ll want to first show the peripheral’s instructions and eventually show the reading instructions once IsReadyToReadFromPeripheral() is called.
public class BluetoothReadingListener: BluetoothPeripheralControllerListener
{
    public override void OnPeripheralDiscovered(BluetoothPeripheralController controller, BluetoothPeripheral peripheral) {
        base.OnPeripheralDiscovered(controller, peripheral);
        String readingInstruction = peripheral.ReadingInstruction;
        // Display the readingInstruction to the user
    }


    public override void OnFail(BluetoothPeripheralController controller, BluetoothPeripheral peripheral, BluetoothPeripheralController.BluetoothError error) {
        base.OnFail(controller, peripheral, error);
        switch (error) {
            case BluetoothError.BluetoothTurnedOff:
                Toast.MakeText(ApplicationContext, "Your bluetooth is off!", ToastLength.SHORT).Show();
                break;
            case BluetoothError.NoUser:
                Toast.MakeText(ApplicationContext, "You have not started the session yet!", ToastLength.LONG).Show();
                break;
            case BluetoothError.Cancelled:
                Toast.MakeText(ApplicationContext, "Bluetooth operation cancelled", ToastLength.LONG).Show();

        }
        Log.E("Error", error.getMessage());
    }


    public override bool OnSuccess(BluetoothPeripheralController controller, BluetoothPeripheral peripheral, IList<Record> records) {

        // If you want to auto-submit records,
        // return true;
        // else if you want to require the user to confirm the record,
        // return false;

        // base method returns true;
         base.OnSuccess(controller, peripheral, records);
    }
};
BluetoothPeripheral peripheral = // the peripheral you want to read from
string instruction = peripheral.Instruction;
// Display the instruction to the user

BluetoothPeripheralController controller = new BluetoothPeripheralController();
controller.ReadFromPeripheral(peripheral, new BluetoothReadingListener());
You have the option to automatically submit records as soon as they are captured, or you can wait for user confirmation before submitting the record. For auto submission, return true inside your ShouldSubmitReadingsFromPeripheral method. If you return false you MUST call Session.Instance.SubmitRecord() or the record will be discarded.
The ValidicMobile library supports reading from bluetooth peripherals without any user interaction once a device has been successfully paired.
The PassiveManager manages background reads and interactions with any BluetoothPeripheralControllers that are in use.
Reading or pairing a peripheral in the foreground will cancel any in progress readings from the background and will restart monitoring in
the background once all bluetooth interaction in the foreground has finished.
To set peripherals to be read in the background use the PassiveBluetoothManager.Instance singleton field:
Set<BluetoothPeripheral> peripherals = new HashSet<>();
peripherals.Add(BluetoothPeripheral.GetPeripheralForID(1);
peripherals.Add(BluetoothPeripheral.GetPeripheralForID(2);
peripherals.Add(BluetoothPeripheral.GetPeripheralForID(3);

PassiveBluetoothManager.Instance.PassivePeripherals = peripherals;
To start the service in the foreground. For Android versions > 25 a notification must be supplied to allow the background scanning to continue to run:
Doze – Documentation regarding Doze
Set<BluetoothPeripheral> peripherals = new HashSet<>();
peripherals.Add(BluetoothPeripheral.GetPeripheralForID(1);
peripherals.Add(BluetoothPeripheral.GetPeripheralForID(2);
peripherals.Add(BluetoothPeripheral.GetPeripheralForID(3);

//Create a notification
Notification notification = ...
NotificationParams params = new NotificationParams(1, notification);

PassiveBluetoothManager.Instance.SetPassivePeripherals(peripherals, params);
To stop monitoring peripherals in the background set the background peripherals to null or an empty set
PassiveBluetoothManager.Instance.PassivePeripherals = null;
To stop monitoring peripherals via the Notification when using a foreground service a PendingIntent should be used to notify a BroadcastReceiver to take the appropriate action:
Register the BroadcastReceiver in the Manifest:
<receiver android:name="com.validic.mobile.ble.BluetoothServiceStopReceiver">
    <intent-filter>
        <action android:name="com.validic.mobile.ble.STOP_BLUETOOTH_SERVICE" />
    </intent-filter>
</receiver>
Add a PendingIntent to be used when the notification is interacted with:
Intent intent = new Intent(BluetoothServiceStopReceiver.ACTION_STOP_BLUETOOTH_SERVICE);
PendingIntent pendingIntent = PendingIntent.GetBroadcast(context, 200, intent, 0);

//Create a notification that uses the pending intent
Notification notification = new NotificationCompat.Builder(context)
                                .AddAction(icon, message, pendingIntent)
                                //continue setting up notification
                                .Build();
Records will be automatically uploaded as they are read. In order to receive events from the the PassiveBluetoothManager, use one of the following two methods. In both cases a PassiveBluetoothManager.BluetoothListener must be created in order to receive the events:
public class BluetoothListener : PassiveBluetoothManager.BluetoothListener
{

    public override void OnSuccess(BluetoothPeripheral peripheral, IList<Record> records) {
        //records received in the background are automatically uploaded
    }

    public override void OnFail(BluetoothPeripheral peripheral, BluetoothPeripheralController.BluetoothError error) {
        //reading failed in the background
    }

    public override void OnPeripheralDiscovered(BluetoothPeripheral peripheral){
        //A peripheral was discovered and we have setup a connection
    }

    public override void OnBackgroundStart() {
        //passive scanning started in the background
    }

    public override void OnBackgroundStop() {
        //passive scanning has stopped in the background either by command or for a foreground reading

};
This listener can either be set on the PassiveBluetoothManager instance:
PassiveBluetoothManager.Instance.SetBackgroundBluetoothListener(listener);
or a PassiveBluetoothReceiver can be registered using the LocalBroadcastManager
var receiver = new PassiveBluetoothReceiver(listener);
LocalBroadcastManager.Instance(context).RegisterReceiver(receiver, PassiveBluetoothReceiver.GetIntentFilter());
There are several situations where passive bluetooth reading is cancelled and resumed at a later time
In all of these cases when passive bluetooth reading is cancelled any current passive readings will be cancelled and the PassiveBluetoothManager.BluetoothListener will receive onCancelled for each of the peripherals.
Other notes
OCR provides the capability to obtain readings from devices without requiring Bluetooth integration. The recognition process is managed by an instance of ValidicOCRController.
An instance of the ValidicOCRController class is used to manage the recognition process. A ValidicOCRPeripheral represents the peripheral being scanned. The controller is initialized with a peripheral object.
The recognition process involves a fragment that containes the camera preview and an overlay image. The fragment must be injected into your view to operate. The camera capture session ends when the fragment is paused.
Note: If your application’s minimum Android version is set higher than API 21 in your Android manifest, you will need to add android:hardwareAccelerated=“true” to the
ValidicOCRPeripheral represents peripheral models that can be processed by OCR.
A peripheral object contains various properties which can be displayed to the user:
Name - Name of the peripheral comprised of the manufacturer name and model number.ImageURL - URL for an image of the peripheral.The ValidicOCRController requires a OCRPeripheral for its initializers.
To obtain a OCRPeripheral, you may choose from a list of all available devices:
IList<OCRPeripheral> allSupportedPeripherals = OCRPeripheral.GetSupportedPeripherals();
or if you know the specific peripheral type that you want:
const int ONETOUCH_ULTRAMINI = 1;
OCRPeripheral onetouchPeripheral = // get peripheral OCRPeripheral.getPeripheralForOCRPeripheralType(ONETOUCH_ULTRAMINI);
Validic provides an activity to encapsulate the OCRFragment. It will perform the necessary permission checking for Android versions > 23. To start an instance of the activity start by using an intent and Activity.StartForResult();
public void startOCRActivity()
{
    Intent intent = new Intent(this, typeof(ValidicOCRActivity));
    OCRPeripheral peripheral = OCRPeripheral.GetPeripheralForId(1); // one touch
    intent.PutExtra(ValidicOCRActivity.PeripheralId, peripheral.ID);
}
Optionally a File path can added to the request if needed:
File f = new File(FilesDir, "image.png");
intent.PutExtra(ValidicOCRActivity.ImagePath, f.AbsolutePath);
Then start the activity for a result
StartActivityForResult(intent, ValidicOCRActivity.ActionReadOcr);
To receive a converged result in the same activity you launched the ValidicOCRActivity override OnActivityResult()
protected override void OnActivityResult(int requestCode, Result resultCode, Intent data)
{
    if(requestCode ==ValidicOCRActivity.ActionReadOcr && resultCode.Equals(Result.Ok))
    {
        OCRPeripheral peripheral = (OCRPeripheral)data.GetSerializableExtra(ValidicOCRActivity.PeripheralKey);
        BaseRecord record = (BaseRecord)data.GetSerializableExtra(ValidicOCRActivity.RecordKey);
        string s = data.GetStringExtra(ValidicOCRActivity.ImageKey);
        File f = new File(s);
        Uri uri = Uri.FromFile(f);
        if (uri != null)
        {
            bitmap =BitmapFactory
            .DecodeStream(ContentResolver.OpenInputStream(uri));
                        //bitmap is now in memory
        }
    }

}
Once a peripheral is obtained, construct the ValidicOCRController and assign it an instance of an IValidicOCRResultListener implementation .
public class ValidicOCRListener: Java.Lang.Object, IValidicOCRResultListener{

    public void DidCompleteReading(BaseRecord record, Bitmap bitmap, ValidicOCRPeripheral peripheral)
    {
        //Full result was obtained
    }
    public void DidProccessResult(VitalSnapResult result)
    {
    //a partial result was returned
    }
};
ValidicOCRListener listener = new ValidicOCRListener();
ValidicOCRController ocr = ValidicOCRController.InitWithOCRPeripheral(peripheral);
ocr.SetListener(listener);
For any glucose meter in our lineup of supported meters, you can now specify mmol/l or mg/dL at runtime for a given reading. If no unit is provided, mg/dL is assumed.
An example using the ValidicOCRActivity:
OCRPeripheral peripheral = OCRPeripheral.GetPeripheralForId(1); // one touch

Intent intent = new Intent(this, typeof(ValidicOCRActivity));
intent.PutExtra(ValidicOCRActivity.PeripheralId, peripheral.ID);
intent.PutExtra(ValidicOCRActivity.GlucoseUnitKey, Unit.Glucose.Mmoll);
An example using the ValidicOCRController:
ValidicOCRController ocrController = ValidicOCRController.InitWithOCRPeripheral(peripheral, Unit.Glucose.Mmoll);
The camera preview and overlay are contained in a fragment that must be injected with an instance of ValidicOCRController. Ensure your view contains a FrameLayout, preferably fullscreen in size, and give it a referencable id such as activity_ocr_fragment_container.
ocrController.InjectOCRFragment(FragmentManager.BeginTransaction(),
                Resource.Id.activity_ocr_fragment_container)
                .Commit();
This will immediatly begin the OCR process.
The preview and overlay are handled by the library, but showing intermediate results is not. You must provide a fullscreen container for the fragment in order for the OCR functionality to be reliable. The relevent part of the overlay is gaurenteed to be no larger than half the height of the screen. Should you choose to show any other views during the OCR process, please restrict them to the lower half of the screen.
During OCR processing, methods on an instance of IValidicOCRResultListener will be invoked.
DidProcessResult(VitalSnapResult vitalSnapResult) is invoked for each camera frame captured and provides intermediate results. The VitalSnapResult object contains the current recognized string. The result string can be displayed to the user as an indication of what portion of the display is not being recognized. Depending on the peripheral, the result string may contain linefeeds representing multiple lines being recognized. The result string also indicates whether glare is affecting OCR of a particular digit by returning the * char, and therefore can be helpful feedback for the user to avoid negative effects of glare on the reading.
The result string also indicates whether glare is affecting OCR of a particular digit by returning the * char, and therefore can be helpful feedback for the user to avoid negative effects of glare on the reading.
Log.V(TAG, "Partial result: " + vitalSnapResult.ToString());
DidCompleteReading(BaseRecord record, Bitmap bitmap, OCRPeripheral validicOCRPeripheral) is invoked when OCR processing has completed with sufficient confidence.
if(validicOCRPeripheral.Type == Peripheral.PeripheralType.GlucoseMeter) {
    Diabetes diabetesRecord = (Diabetes) record;
    Log.V(TAG, "Blood glucose captured: " + diabetesRecord.BloodGlucose.ToString());
}
The value received from the listener should be verified by the user and then submitted to the Validic server.
// After verification, queue the record and the image to be uploaded to the server
Session.Instance.SubmitRecord(record, bitmap);
The listener is passed a Record subclass appropriate for the peripheral and the matching cropped preview image with embedded additional metadata. The recognized values returned in the record should be visually validated by the user. The cropped preview image can be displayed to the user to validate the recognized values before uploading to the server.
When the user approves of the values, the record can be uploaded as described in Managing a Session.
OCR processing commences when the ocr fragment is injected into your view.
Processing is stopped when the fragment is paused or a final value has been converged. If no value has been converged on, the fragment will resume processing onResume. To restart or to take additional readings with the same peripheral, simply call restartOCR on the ValidicOCRController.
ocrController.RestartOCR();
IMPORTANT: Before you begin development, please note that the Samsung Health integration requires pre-approval from Samsung for their Device SDK. Validic is working with Samsung on a process for new approvals. Please reach out to Validic Support at support@validic.com to be notified when Samsung begins accepting new approvals.
Validic Mobile allows setting subscriptions on SHealth Data Types through the SHealthManager. The SHealthManager is a singleton object and should be accessed through the SHealthManager.Instance property. Validic only allows for reading values from the Samsung SHealth Datastore, it has no writing capability.
You can download the jar from the Samsung Health website: http://developer.samsung.com/health
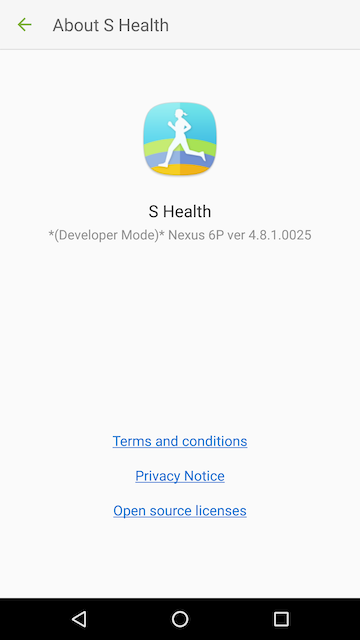
In order to test you must enable developer mode in the S Health app on your phone. As of shealth sdk version 1.2.1, you enable developer mode by going to the More->Settings->About S Health and tapping the version number until “(Developer Mode)” is displayed next to it.
Note: In order to gain access to S Health data without developer mode enabled you must first be approved by Samsung. You may request access here:
http://developer.samsung.com/health/apiaccess
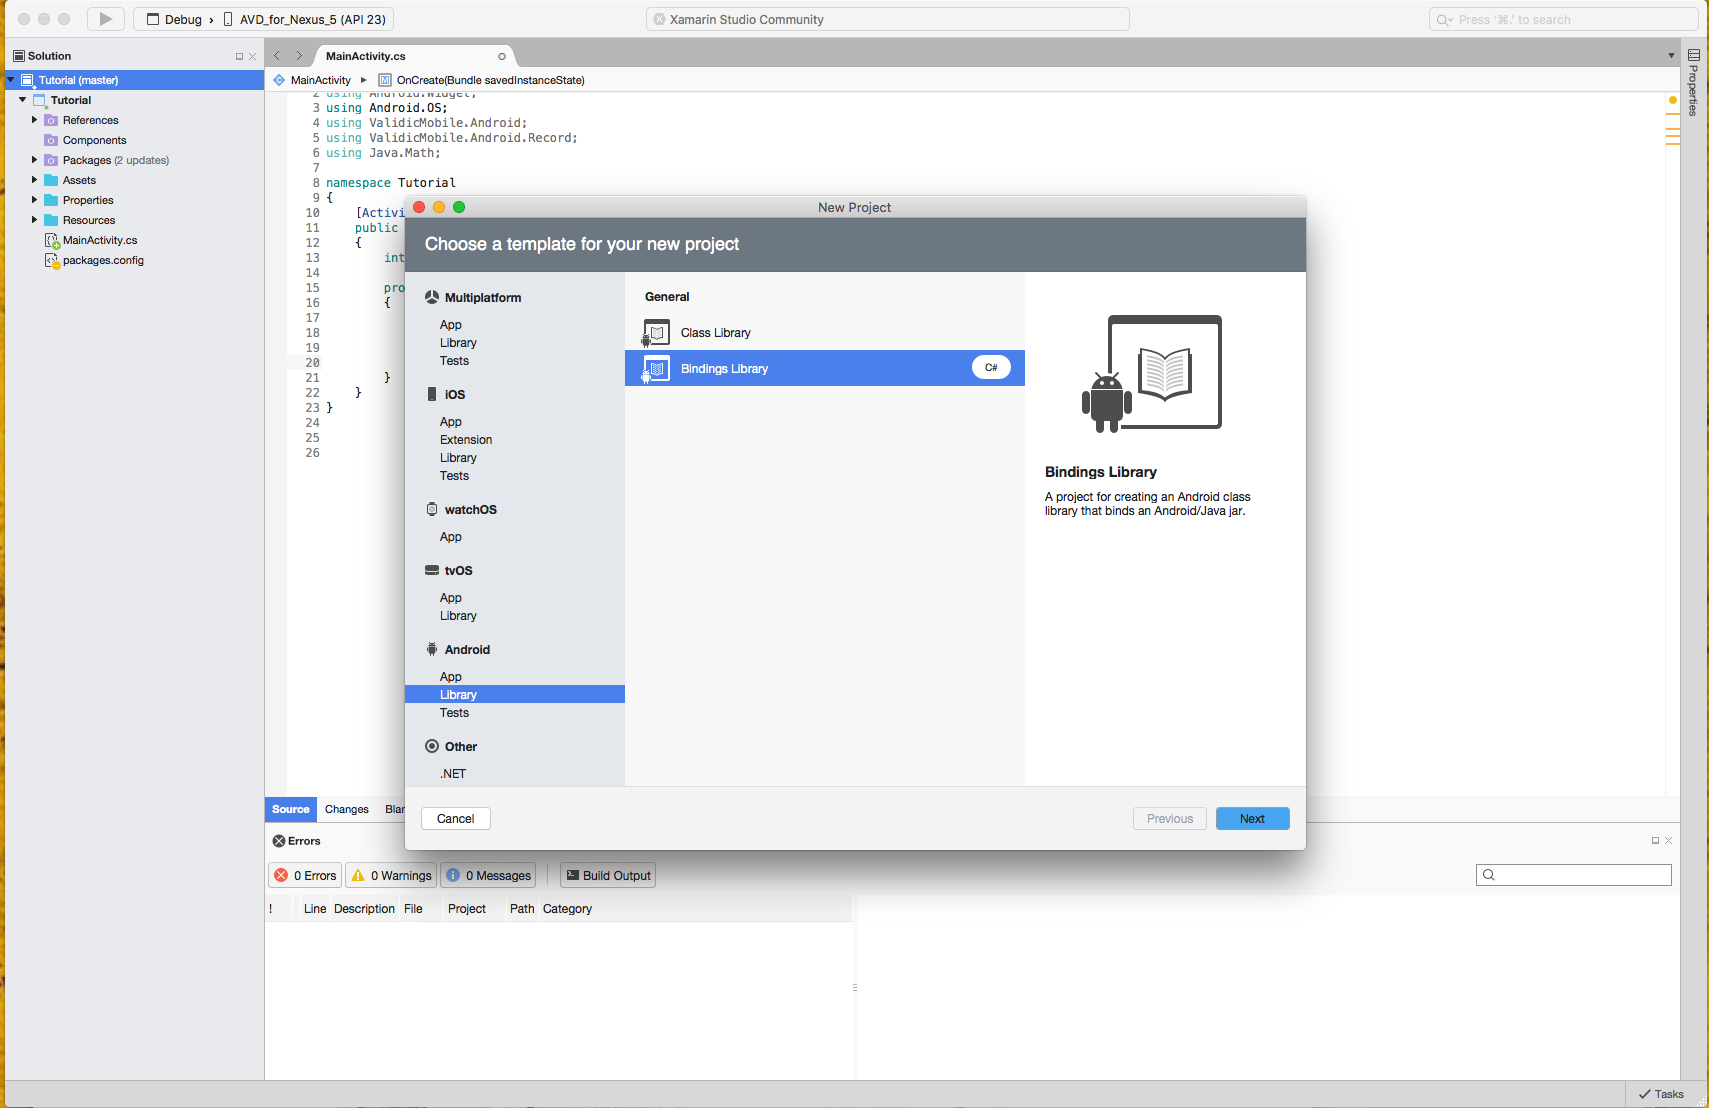
In order to use SHealth with Xamarin a Java binding library for the SHealth jar must be addded to your project. Right click on your Solution and add a new project to the solution and select Binding Library under Android.
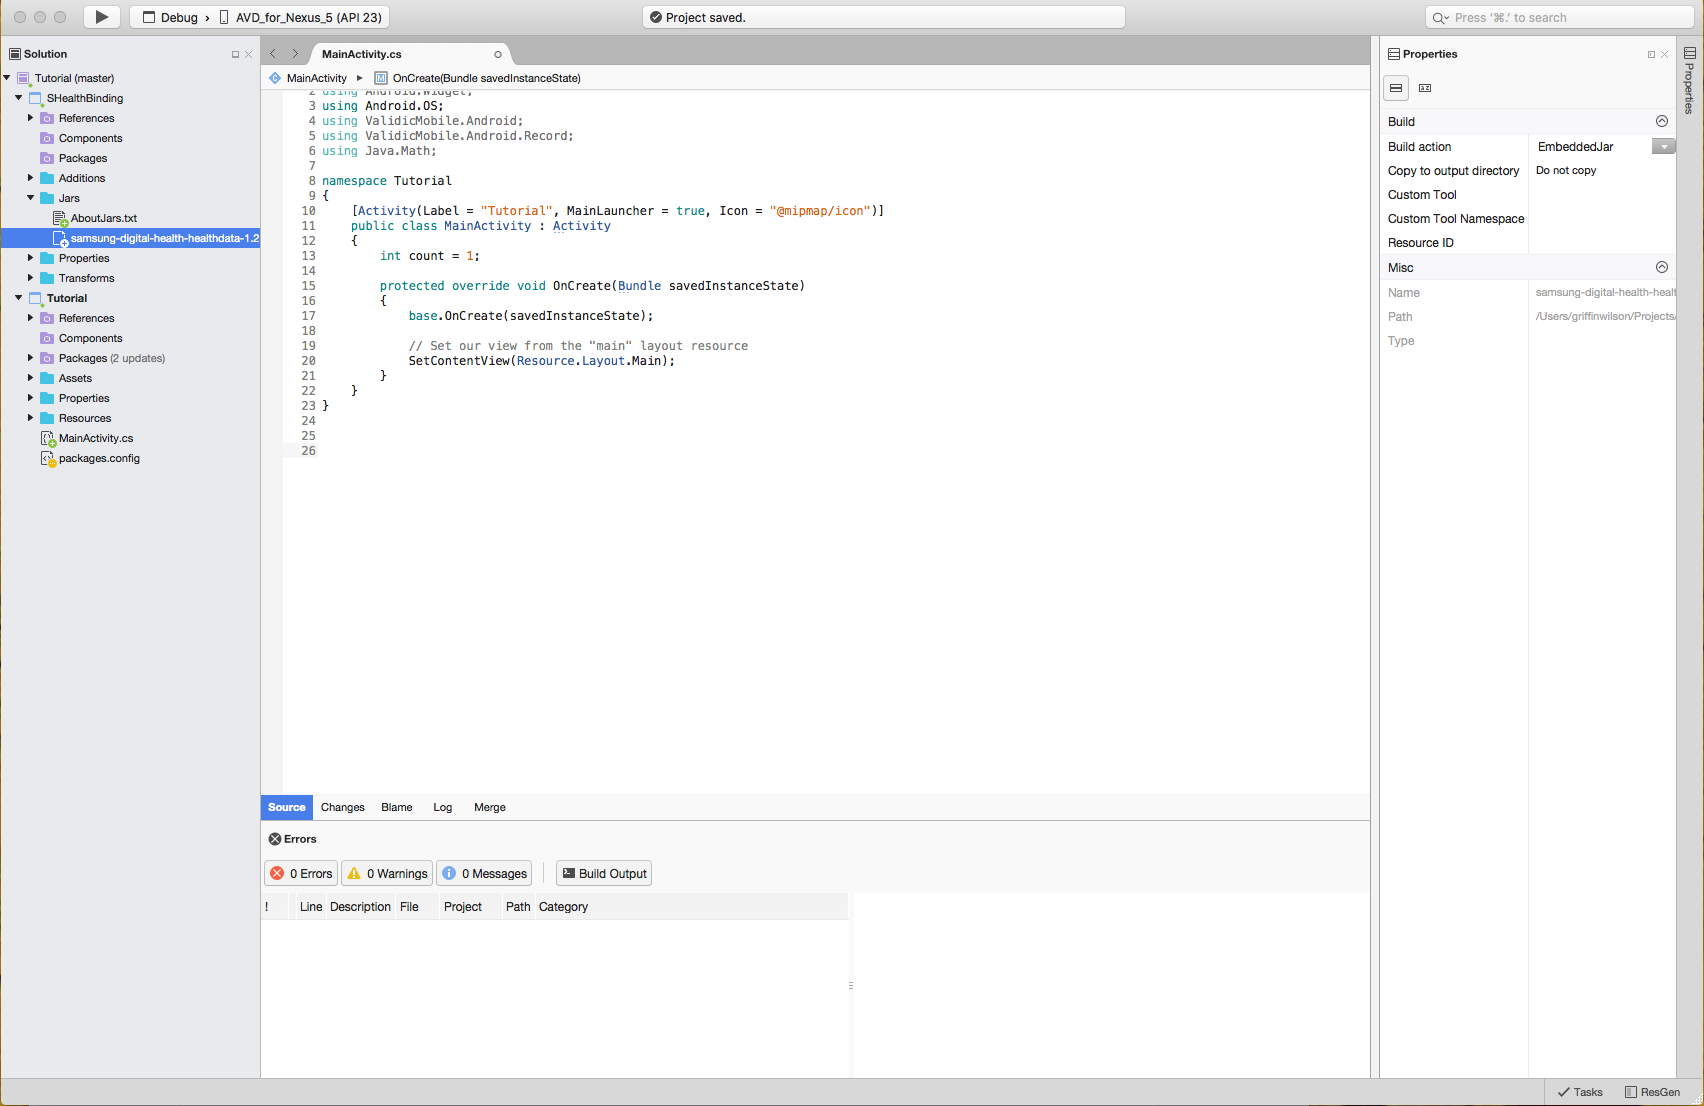
Add the SHealth Jar you have downloaded from Samsung Developer Portal to the project by right clicking on Jars/ and selecting Add>Add Files and select the samsung-digital-health-*.jar you have previously downloaded. It is up to you whether to copy, move, or link to the jar to the project.
The Jars/ folder contains a text file named AboutJars.txt. This text file describes the different binding properties for the SHealthJar for C#. Right click on the Jar to change to jars properties. The Samsung Health Jar’s Build Action must be either EmbeddedJar or EmbeddedResourceJar
Try to build the library and you will receive 2 errors. Open Transforms/Metadata.xml and add these 2 lines to modify the build:
<attr path="/api/package[@name='com.samsung.android.sdk.healthdata']/interface[@name='HealthConstants.HeartRate']/field[@name='HEART_RATE']" name="managedName">HEART_RATE_CONSTANT</attr>
<attr path="/api/package[@name='com.samsung.android.sdk.healthdata']/interface[@name='HealthConstants.Weight']/field[@name='WEIGHT']" name="managedName">WEIGHT_CONSTANT</attr>
Build again and the errors will be gone.
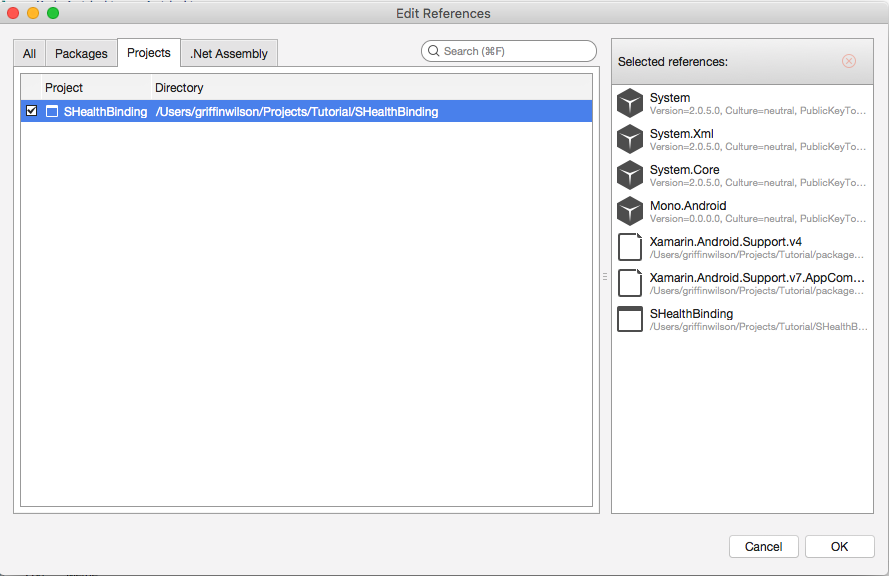
Now the SHealth Binding library has been created a reference to it must be added to the main project. Double click references and add a reference to the binding project.
Samsung provides several data types that can be subscribed to for notification when data changes.
The available data types are:
NOTE: Data types that are going to be used in your application must be added to the AndroidManifest.xml.
<application>
    //rest of app

    <meta-data android:name="com.samsung.android.health.platform_type" android:value="rel" />
    <meta-data
        android:name="com.samsung.android.health.permission.read"
        android:value=" com.samsung.health.blood_glucose;
                        com.samsung.health.blood_pressure;
                        com.samsung.health.body_temperature;
                        com.samsung.health.caffeine_intake;
                        com.samsung.health.exercise;
                        com.samsung.health.food_info;
                        com.samsung.health.food_intake;
                        com.samsung.health.hba1c;
                        com.samsung.health.heart_rate;
                        com.samsung.health.oxygen_saturation;
                        com.samsung.health.sleep;
                        com.samsung.health.sleep_stage;
                        com.samsung.health.uv_exposure;
                        com.samsung.health.water_intake;
                        com.samsung.health.weight;
                        com.samsung.shealth.step_daily_trend" />
Data types are grouped into logical sets, SHealthSubscription.SubscriptionSet is an Enum that groups several data types together to register for related data types.
The available subscription sets are:
The group of data types for each subscription set can be found using:
SHealthSubscription.PermissionStringsForSubscriptionSet(SHealthSubscription.SHealthSubscriptionSet.FITNESS);
Subscribing to S Health updates only needs to be done once for a user. The subscriptions will be persisted across app launches in the Session object.
Data types can be subscribed to individually:
SHealthManager.Instance.AddSubscriptionsForDataTypes("com.samsung.health.blood_glucose", "com.samsung.health.blood_pressure");
or as part of a subscription set:
SHealthManager.Instance.AddSubscriptionsForDataTypes(SHealthSubscription.PermissionStringsForSubscriptionSet(SHealthSubscription.SHealthSubscriptionSet.FITNESS));
To start the S Health service in the foreground. For Android versions > 25 a notification must be supplied to allow the background scanning to continue to run:
Doze – Documentation regarding Doze
Individual subscription:
    //Create a notification
    Notification notification = ...
    NotificationParams params = new NotificationParams(1, notification);

    SHealthManager.Instance.AddSubscriptionsForDataTypes(param, "com.samsung.health.blood_glucose", "com.samsung.health.blood_pressure");
As a subscriptions set:
    //Create a notification
    Notification notification = ...
    NotificationParams params = new NotificationParams(1, notification);

    SHealthManager.Instance
        .AddSubscriptionsForDataTypes(
                params,
                SHealthSubscription.PermissionStringsForSubscriptionSet(SHealthSubscription.SHealthSubscriptionSet.FITNESS)
        );
To stop monitoring peripherals via the Notification when using a foreground service a PendingIntent should be used to notify a BroadcastReceiver to take the appropriate action:
Register the BroadcastReceiver in the Manifest:
<receiver android:name="com.validic.mobile.shealth.SHealthServiceStopReceiver">
    <intent-filter>
        <action android:name="com.validic.mobile.shealth.STOP_SHEALTH_SERVICE" />
    </intent-filter>
</receiver>
Add a PendingIntent to be used when the notification is interacted with:
Intent intent = new Intent(SHealthServiceStopReceiver.ACTION_STOP_SHEALTH_SERVICE);
PendingIntent pendingIntent = PendingIntent.GetBroadcast(context, 200, intent, 0);

//Create a notification that uses the pending intent
Notification notification = new NotificationCompat.Builder(context)
                                .AddAction(icon, message, pendingIntent)
                                //continue setting up notification
                                .Build();
Validic provides the ability to query 6 months of data for a subset of data types provided by Samsung Health by querying
a group of ValidicMobile.SHealth.SHealthHistoricalSet
Currently only 2 historical sets are available
Simply call the method on the SHealthManager instance to perform the operation
ValidicMobile.SHealth.FetchHistoricalSets([SHealthSubscription.SHealthHistoricalSet.FITNESS]);
Operations performed on SHealth are asynchronous. To listen for events a listener can be placed on the SHealthManager.Instance.
public class MySHealthListener: Java.Lang.Object, ISHealthListener
{
    public void onPermissionChange(string[] accepted, string[] denied)
    {
        // Permissions have changed. Track them from  here
    }
    public void onError(SHealthError error)
    {
        //Handle the error type here
    }
    public void OnRecords(<BaseRecord.RecordType, Java.Lang.Integer> summary){
        //Data has changed for one of the the subscriptions and records were gathered
        //Dictionary is keyed by the record type that was gathered and reports how many of each record type were changed.
    }

    public void OnHistoricalFetch(<BaseRecord.RecordType, Java.Lang.Integer>) {
        //Data has been returned from a historical data fetch
        //Dictionary is keyed by the record type that was gathered and reports how many of each record type were changed.
    }

}
ISHealthListener listener = new MySHealthListener();
SHealthManager.Instance.SetListener(listener);
In order to resume listening for subscriptions upon app launch you must call ObserveCurrentSubscriptions() inside your application’s onCreate function:
public class YourApplication : Application {

    public override void OnCreate() {

        base.OnCreate();

        Validic.Instance.Initialize(context);
        SHealthManager.Instance.ObserveCurrentSubscriptions();

    }

}
Calling Session.Instance.EndSession() will remove all S Health subscriptions and stop listening for new data.